Showing posts with label Dining in. Show all posts

Thursday, October 16, 2014

Hand Rolled Cavatelli

     Being your average twenty-something year old culinary school graduate, I'm stuck between two interests that I hold very dear to me; eating gourmet food and saving money. Because of this dilemma, I eat lots and lots of fresh pasta. For any budget-oriented foodie, learning to make fresh pasta is a godsend. With a few cheap ingredients(flour, eggs, time) anyone can make a restaurant-worthy meal any night of the week. Cavatelli are a traditional Italian pasta that are hand formed and are said to look like 'little sea shells' although I don't see the resemblance. In my opinion, they are the perfect hand formed pasta. Their deep ridges soak up any sauce, making them extremely versatile and textural; they're thick enough to maintain an al dente texture when cooked yet not so thick that they're doughy; and best of all, they don't require any expensive machines or a huge investment of time. All you need to form them is a cavatelli board (also referred to as a gnocchi board or gargonelli board).
     The first skill that needs to be mastered is the dough, and with a simple ratio and a little practice, it's pretty simple. My favorite ratio when making pasta dough is 100 grams of flour to one egg. Almost every source online or in books will begin their pasta dough recipes with something like "make a mound of flour on a wooden tabletop and create a well in the center." While effective as a method of forming dough, this is an extremely messy technique and often discourages beginners because of the amount of practice it requires to avoid spilling egg on the floor. Instead, I make my pasta dough using an identical method, but in a large bowl with a flat bottom. This allows ample room to mix the dough just as I would on a table, but catches any run-off egg and incorporates it back into the dough.
     Form a mound of dough and create a well in the center and add the egg, one tsp of olive oil and a pinch of salt. Beat the egg thoroughly with a fork and slowly incorporate the flour until it starts to look like a crumbly mess and can no longer be mixed with a fork. Knead the mixture with your hands until all of the flour is completely incorporated and a loose dough is formed. On a table top, continue kneading for ten minutes, until the dough is very smooth. You shouldn't need much flour during the kneading and the dough should be moist but not sticky at all. form the dough into a ball, wrap in plastic wrap, and allow the dough to rest at room temperature for thirty minutes.
     After thirty minutes, unwrap the dough. when you poke it with your finger, it should leave a dent and not spring back. This means that the gluten has relaxed. To form cavatelli, start by rolling the dough out with your palms into a long, thin rope, then use a sharp knife to cut it into small pieces.
     The pieces of dough can stick together, so it's a good idea to lightly flour the dough, your cavatelli board and the surface you'll be putting the finished cavatelli on. Take one piece of dough, place it on the cavatelli board and push down and foreward with your thumb to flatten the dough and roll it into a cylinder that is imprinted with the ridged pattern of the board.


For those who prefer a video demonstration

and once more in Slo-mo


Your finished product should look something like this
Now all you need to do is boil them in water for 5-10 minutes and serve them with your favorite sauce.
Hand-rolled cavatelli with vermont sharp cheddar, provolone and toasted panko (A.K.A. Super cheesy mac 'n' cheese)


Monday, November 25, 2013

Thanksgiving.. Quail?

     Thanksgiving week is finally upon us, and if you're in charge of the meal, things are about to get pretty hectic. Preparing any holiday meal can be tough, especially the biggest one of the year. I find that people often over complicate things by making too many dishes with too many steps, and if that's not something you do every day, it's going to be stressful. This year, a few of my friends and I will be having a small post-Thanksgiving celebration and we've decided to get together to cook the meal as well. Cooking with friends is always more fun than cooking alone, and the teamwork that it takes to put out a good meal is nothing short of bonding. We're keeping our meal pretty simple, and hopefully the recipes will inspire some ideas in your kitchen for this year's meal.
     Since there are only five of us celebrating, buying a turkey would just be too much food, and we wanted to change it up a bit, so we decided to roast some quail. Quail is mostly dark meat, and you'll need one or two per person, so if you're cooking for the whole family, I'd stick with a turkey. Many people think of quail as a luxury food, only served in high end restaurants, but they're actually fairly cheap and delicious. Rather than making mashed potatoes, we're going to add some texture by making a potato 'risotto,' and because no feast is complete without a salad, we'll also make a simple shaved fennel salad.

Crispy Roasted Quail with Potato 'Risotto' and Shaved Fennel

Yields enough for a five person meal
Ingredients:
Quail
 10 quail
2 bunches of thyme
10 large collard green leaves, cut into small chunks
2 cloves of garlic, minced
Kosher salt and black pepper, to taste

 Potato 'Risotto'
3 lbs waxy potatoes, such as Yukon Gold or Red Bliss, diced into about 1/4 inch cubes
3 shallots, diced
2 tbsp unsalted butter
chicken stock or water, as needed
1/4 cup heavy cream
grated Parmesan cheese, to taste
Kosher salt and black pepper, to taste

Shaved Fennel
2 medium-large bulbs of fennel, shaved as thin as possible on a mandolin
1/3 cup rice vinegar
1/4 cup red wine vinegar
1 cup olive oil
Kosher salt, pepper, sugar, and thyme leaves, to taste

Quail
     Preheat your oven to 400 degrees Fahrenheit. bring a large pot of water to a boil, and blanch your collard greens for about one minutes, then remove them into an ice bath. Once they are cool, transfer them to a bowl with the garlic and season to taste with salt and pepper. Season the quail well with salt and pepper, and stuff the cavity with your collard greens. holding the drumsticks together, push the legs of each quail in towards the body to plump it up, then tie a piece of string, first around the drumsticks to hold them together, then around the body to keep the legs tucked in. This will promote even cooking and a nice shape to the finished bird. In an oven proof skillet, heat about 1/8 inch of cooking oil (I like to use avocado oil because of its high smoke point) and once it is hot, add your quail, breast side down. Once the skin on the breast is seared and crispy, flip your quail over, add the thyme branches to the pan, and transfer it to the oven. After 10 minutes, remove the quail from the oven and baste it with the juices in the pan. Transfer it back to the oven for another five minutes, or until t is cooked to your desired doneness.

Potato 'Risotto'
      In a large pan, at least a couple inches deep, heat a small amount of cooking oil and sauté the shallots. When they are soft, add the potatoes an
d season with salt and pepper. Cook the potatoes, stirring occasionally, for about 5 minutes, or until most of them are nicely seared. Add enough stock to barely cover them, and cook, stirring frequently, until almost all of the liquid is absorbed. Continue adding stock, about 3 tablespoons at a time, waiting for each addition to dissipate before adding the next, until the potatoes are tender. To finish, add the cream, butter, and cheese. Taste and adjust your seasoning if necessary.

Shaved Fennel
     in a blender, combine all of the ingredients except the fennel and blend, tasting occasionally and adjusting seasoning, until the vinaigrette is frothy and emulsified. In a large bowl, toss the fennel with just enough vinaigrette to coat it. The rest of the vinaigrette can be saved in the fridge for further use.


Saturday, August 24, 2013

Husk Cherry Clafoutis with Cantaloupe and Cucumber Yogurt

     Every year, it seems as though summer is getting shorter and shorter. It still feels like it has only been a few weeks since the warm weather arrived, although it is already packing up it's belongings and preparing to slowly slip out of our grasp as fall washes over the East Coast. While the end of summer is a sad time for most, it is always a bittersweet time for me. Bitter, of course, because soon the glorious season of abundance will be gone, along with all of the light, crisp summer vegetables. However, it is also very sweet for a few reasons. First of all, the end of summer means that fall is almost here, and nothing is quite as nostalgic and quaint as the corn maze navigating, pumpkin picking, fire-side reading season of autumn. The second reason to love the end of summer isn't because of what is to come in the months ahead, but what is already here - husk cherries. These tiny husked fruit begin to pop up for a short time at farmers markets in New England towards the end of summer, and what a glorious short time it is.
   If you are not familiar with husk cherries, they look - at first glance - like miniature tomatillos, carefully wrapped in a delicate natural packaging, giving them a great presentation as an after-dinner-snack when entertaining guests. Although the husk isn't what makes this fruit so special. Once you unwrap a husk cherry, it is a small yellow cherry-tomato-looking thing with a very unique taste. Some people say that they taste like pineapples, while others compare them to mangos. To me, the flavor falls somewhere between a mango, a kumquat and a sweet, just picked tomato.
    Recently, I found some husk cherries at a farmers market, and I wasn't exactly sure what to do with them. While the idea of a chutney or tart sounded delicious, I couldn't help but feel like such a unique and rare fruit needs to be treated simply and left whole, so that it can be appreciated for exactly what it is. I eventually settled on a clafoutis-kind-of. A clafoutis is an old school rustic French dessert. The kind of thing that house wives have been making for ages. A traditional French clafoutis consists of cherries, which are placed in a baking pan and have a almond-flavored custard batter poured over them before being baked in the oven. This recipe differs from a traditional clafoutis in two ways. First, that we will be using husk cherries instead of cherries, and second, that we will be using vanilla extract to flavor the custard rather than almond extract. I personally find that the delicate flavor of vanilla does more to compliment the light sweetness of the husk cherries, although you can use almond extract if you prefer. This dessert tastes best when served still-warm with a spoonful of a cold cucumber and cantaloupe melon yogurt to offset the sweetness with tart and refreshing flavors.
 
 
Husk Cherry Clafoutis
1 Pint Husk Cherries
2 Large Eggs
2/3 Cups sugar
2/3 Tbsp Flour
1/2 Cup Whole Milk
1/4 tsp Vanilla Extract
 
Preheat an oven to 375 degrees. Butter and flour a gratin dish or oven-safe pan and spread the husk cherries evenly throughout the bottom of the pan. In a separate bowl, beat the eggs along with the flour and sugar. When they are well beaten, add the milk and vanilla extract. Pour your custard batter into the baking dish, just enough to almost cover the husk cherries. Put the clafoutis in the oven until the top begins to brown and it is cooked through. A knife or fork - when inserted into the custard - should come out clean. While your clafoutis in baking, you can make this simple yogurt topping.
 
 
Cucumber Cantaloupe Yogurt
 
Plain yogurt(Preferably from a local artisan producer such as Narragansett Creamery)
Cucumber, finely diced
Cantaloupe, finely diced
 
 
You may have noticed that there are no quantities listed for these ingredients, and that is mostly because there really is no right or wrong way to make this. Add more or less of each ingredient as you would like. The cantaloupe adds sweetness; the cucumber adds a refreshing element and the yogurt adds a tart flavor, so keep that in mind when choosing your quantities. Of course, if it doesn't come out how you would like, then you can always add more of any ingredient, and if plain yogurt is too tart for you, feel tree to add some honey or agave nectar. To prepare the sauce, simply fold the cucumber and cantaloupe gently into the yogurt Be careful not to mix your yogurt too much or it will become thin and runny. To serve, wait for your clafoutis to cool to just above room temperature, use a spatula to scoop some onto a plate, and add a spoonful of the yogurt. This makes an excellent sweet treat for a summer afternoon spent sitting in the sun.


Wednesday, August 14, 2013

On Gnocchi

     Ah, gnocchi (pronounced nyaw-kee): what fond memories I have of thee. If you are not familiar with gnocchi, you're missing out. These adorable little dumplings are a traditional Italian treat, made with either potato or ricotta cheese, boiled, and often seared in butter or tossed with an herby sauce. But, of course, my love for gnocchi goes far beyond their unique taste and texture. As with any true human-food-romance, I share a sort of emotional connection with this dish, and with the fact that each dumpling is completely different and tells its own story.

Exhibit A (Photograph is from http://www.sallypasleyvargas.com, an absolutely wonderful food blog):
   Notice the shape of these dumplings, and the fork on the bottom right. Gnocchi have a unique ridged shape that, when home-made, must be done by hand with either a fork or a nifty little tool called a gnocchi board - but I prefer using a fork for a more rustic outcome, as well as a much more nostalgic experience. Now those ridges means that each and every single dumpling is handled individually, crimped by hand with a fork, and inspected by the gnocchi-artist for quality assurance. A plate of homemade gnocchi is special in a way that not many foods are, and that is that each single gnocchi on that plate is a little different, and that they were each made and shaped with a huge amount of time and love. Fresh gnocchi isn't a plate that can just be slapped together on your lunch break, but with a little time and a lot of care, you can create something truly amazing that will not only taste great, but it will make you feel great knowing that you crafted your dinner from scratch.
   For a long time, gnocchi was almost unheard of in the states, even on the east coast where "Italian" culture is pretty popular. I have vivid memories of going to "Italian" restaurants of the late 90's and asking for gnocchi, only to be met with a blank, confused stare by a waiter who had obviously never heard the word in his life. Also, I remember quite well one particularly amusing classroom moments during my first year of culinary school, involving a student who was assigned a recipe for gnocchi, and - having never heard the word - sounded it out as ga-noh-chee. He spent the first 30 minutes of class asking if anyone had ever heard of ga-noh-chee before someone finally explained what they were and how to pronounce them. He had changed majors by the end of the trimester. Now does that mean that they was impossible to find until recently? Of course not! It was just a bit of a scavenger hunt. Although that has changed, and gnocchi can be found at the tables of many rustic Italian restaurants and bistros today, but the obvious truth is that no restaurant gnocchi will ever compare to what you can make at home. For me, gnocchi are a great go-to item when I'm planning dinner for my family or friends. Not only does the flavor and craftsmanship impress, but many Italian friends have never seen or heard of this authentic dish, and there's no better feeling than introducing a friend to their new favorite food.

As previously stated, gnocchi can be made from either potato or ricotta cheese, so here are the recipes that I use for each dough.

Ricotta Gnocchi


2 cups ricotta
2 large eggs, lightly beaten
1 1/2 cups grated Parmesan cheese
all-purpose flour as needed
1/2 stick unsalted butter
salt to taste

Potato Gnocchi

6 russet potatoes, baked, skinned and mashed (or some of last night's leftover mashed potatoes)
4 egg yolks
all-purpose flour as needed,
salt to taste


   For both dough recipes, start by combining all ingredients except flour in a bowl. Slowly add flour while mixing until a soft, somewhat sticky dough is formed. Once your dough is formed, you do not need to let it rest before forming your gnocchi. To form your gnocchi, simply take a handful of dough, and roll it out into a log, about 1/2 in or larger if you want bigger gnocchi. Using a knife, cut your dough log into pieces, depending on how large you want them to be. Now comes the fun part.
   

   Take one of your gnocchi and roll it into a ball between your hands. Then, roll it gently over the back of a well floured fork. You should end up with small oval dumplings with even ridges. Don't get discouraged if your first few gnocchi don't come out well. It takes some practice to learn the technique, but it's well worth the practice, and rolling gnocchi with your family or friends can be a fun social event before dinner. Once your gnocchi are formed, lay them out in a single layer on a floured surface. When you're ready to cook them, just drop them into a pot of salted boiling water. Unlike homemade pasta, fresh gnocchi will take a couple of minutes to fully cook through, and they can be doughy when not fully cooked.
   As for sauce, I like to keep it simple. Gnocchi go great with three things: butter, herbs and vegetables. I like to saute some herbs and garlic in a little butter while my gnocchi are cooking. When they're finished, I toss my gnocchi in the pan with the butter and let them get brown on one side. Be sure to do this in small batches to avoid over-crowding your pan. If you want to add vegetables, add them before the gnocchi to let them cook, or precook them and toss them in with your finished gnocchi.

Ricotta Gnocchi with Rosemary and Oven Roasted Beets

Potato Gnocchi with Basil, Chives and Pickled Radishes

Monday, March 11, 2013

Cream Of Asparagus Soup

     After a very long and unexpected winter in Rhode Island, it looks like spring in finally beginning to wake up from hibernation, and this is good news for anyone who's getting sick of out-of-season produce flown halfway across the world to American supermarkets. Spring is the prime harvesting season for all sorts of delicious fruits and veggies, including Kiwi, Leeks, Artichokes, and one of my absolute favorite vegetables: asparagus. Asparagus can add flavor to so many different dishes. Everything from an omelet to a stir-fry can be enhanced by the full, crisp flavor of fresh asparagus, but I like to let the flavor of asparagus really shine through by combining it with as few ingredients as possible. Cream of asparagus soup is easy and simple to make, using only a few ingredients, yet it's still healthy and extremely flavorful. If you can find locally grown asparagus at a farmers market or at a local farm, that would be preferred and give you the best tasting soup, but if not, supermarket asparagus will work. Just try to purchase it between February and June, because that is the time of year during which it will be freshest.


Ingredients
1lb asparagus (Feeds two hungry people)
2-4 cups chicken stock (If you have home made stock, use that. If you would like to make this recipe vegetarian, vegetable stock can be used instead.)
1/2 cup grated Parmesan cheese
3-4 tbsp butter
1.5 Oz all-purpose flour
1 French baguette
 
 
     First, you want to put your stock on to boil. You should use just enough stock to fully submerge your asparagus. While your stock is heating up, cut your asparagus into pieces about one to two inches in length. Once your stock begins to boil, add your asparagus, and leave it to boil until the asparagus is very tender. I like to leave one or two stalks of asparagus out and slice it thin as a garnish for the soup, but that's optional.
 
 
      While my asparagus boils, I like to make some croutons to use as an auxiliary ingredient which will add a crunch element to the finished soup. To do this, simply slice a French baguette into 1/4-1/3 inch slices. Lay your slices out onto a baking sheet, and top with butter, salt, pepper, garlic, and a sprinkling or Parmesan cheese. Preheat your oven to 375 degrees (I like to use my toaster oven, but if you're making a large batch of soup, you can use a full oven). These cook in a few minutes, so don't put them in the oven until you're soup is almost ready to be served.
 
 
     Once your asparagus is fully cooked and very tender, it's time to puree your soup. If you have an immersion blender, use that to puree your soup right in the pan, but if not, transfer your soup to a blender and puree until you have a smooth creamy mixture. Return your soup to the stove, add your Parmesan cheese, and stir until it melts in. Now, for to finish off this soup, we'll need to thicken it slightly with a rue. In a separate pan, melt your butter and add your flour. Whisk this mixture constantly as it cooks for about five or six minutes, just until it starts to turn light brown.
     Once your rue is cooked, whisk it in to your soup and boil for about two minutes until your soup reaches your desired thickness. Now, you can season with salt and pepper if needed. Finally, garnish with your croutons and sliced asparagus, and enjoy! Delicious, simple, and fresh. Let's nosh!


Sunday, February 17, 2013

Roasted Vegetable Ravioli

     Growing up in an Italian family, ravioli was always present in my household, and a staple in my diet. Of course when I was a child, I never could have guessed what type of ingredients were used to make these soft little pouches of joy. No, to me, they were just there, and the only worry I ever had about ravioli was "How man of these can I eat before I have to stop?" But as I grew older, curiosity soon took hold of me, and as I made my transition from boy to cook, it didn't take long for me to want to delve deeper into the world of ravioli and learn how to create this savory treat myself. Once I started the Culinary Arts program at my high school in Cranston, pasta dough was one of the very first things we had learned how to make.
     Enter: Adam at age fifteen, circa 2007, inside the culinary Arts lab of Cranston High School West. It is the first week of class, and I am about to burst with excitement. I have been waiting years to work with a real chef and learn what cooking is all about. I watch intently, noting every single movement as Chef Martha Sylvestre shows us all for the first time, how to make fresh pasta dough. Since that day, store bought pasta has never quite tasted the same. It may be a labor of love, but I've never sat down to eat home made pasta and said anything other than "Wow, That was worth all the work."

Pasta Dough
Ingredients:
3 cups all purpose flour
2 eggs
2 tbsp. water
 
Directions
1. create a mound using two cups of flour. Create a well within the mound. Add the eggs and water into the well.
 
2. Beat the eggs with a fork, and slowly grab and incorporate more and more flour with your fork as you are beating. Do this until a dough begins to form and you cannot beat with a fork anymore.
 
3. Using your hands, incorporate some more flour and on a floured surface, begin kneading the dough, incorporating flour as needed, until the dough has a little elasticity. The dough should be moist, yet not wet enough to be sticky.
 
4. Cover your dough-ball in plastic wrap, and allow it to rest for about twenty minutes before using.
 
5. Repeat this process as many times as you need to for the desired amount of pasta. Each ball of dough will feed about two people.
 
If you have a food-processor, you can simply add two cups of flour, the eggs, and the water and use that to incorporate, but I personally like to do it by hand.


     The first time you try to make pasta dough, it might not come out right, whether it isn't the right consistency, or just a little over-kneaded, but don't get discouraged. Every time I make this, it becomes a little bit easier and a tastes a little bit better. Once you've made it a few times, it will become second nature.
     After your pasta dough is made, you're well on your way to making home made ravioli. The next step is the filling. Everyone had their own preference of what they like to put in their ravioli filling, whether it be pork, beef, ricotta cheese, or like me, lots of veggies.
 
Roasted Vegetable Ravioli Filling
Ingredients
1/2 zucchini, small dice
1/2 yellow squash, small dice
1/2 carrot, fine dice
3-4 asparagus, thinly sliced
3-4 Oz olive oil
Salt & Pepper, to taste
 
Directions
1. In a mixing bowl, combine all of the ingredients and toss to coat evenly with seasonings and oil. If desired, you can add more or less olive oil.
 
2. Spread the vegetable mixture out on a sheet pan, and put into an oven at 400 degrees Fahrenheit until the vegetable soften and begin to brown.
 
 
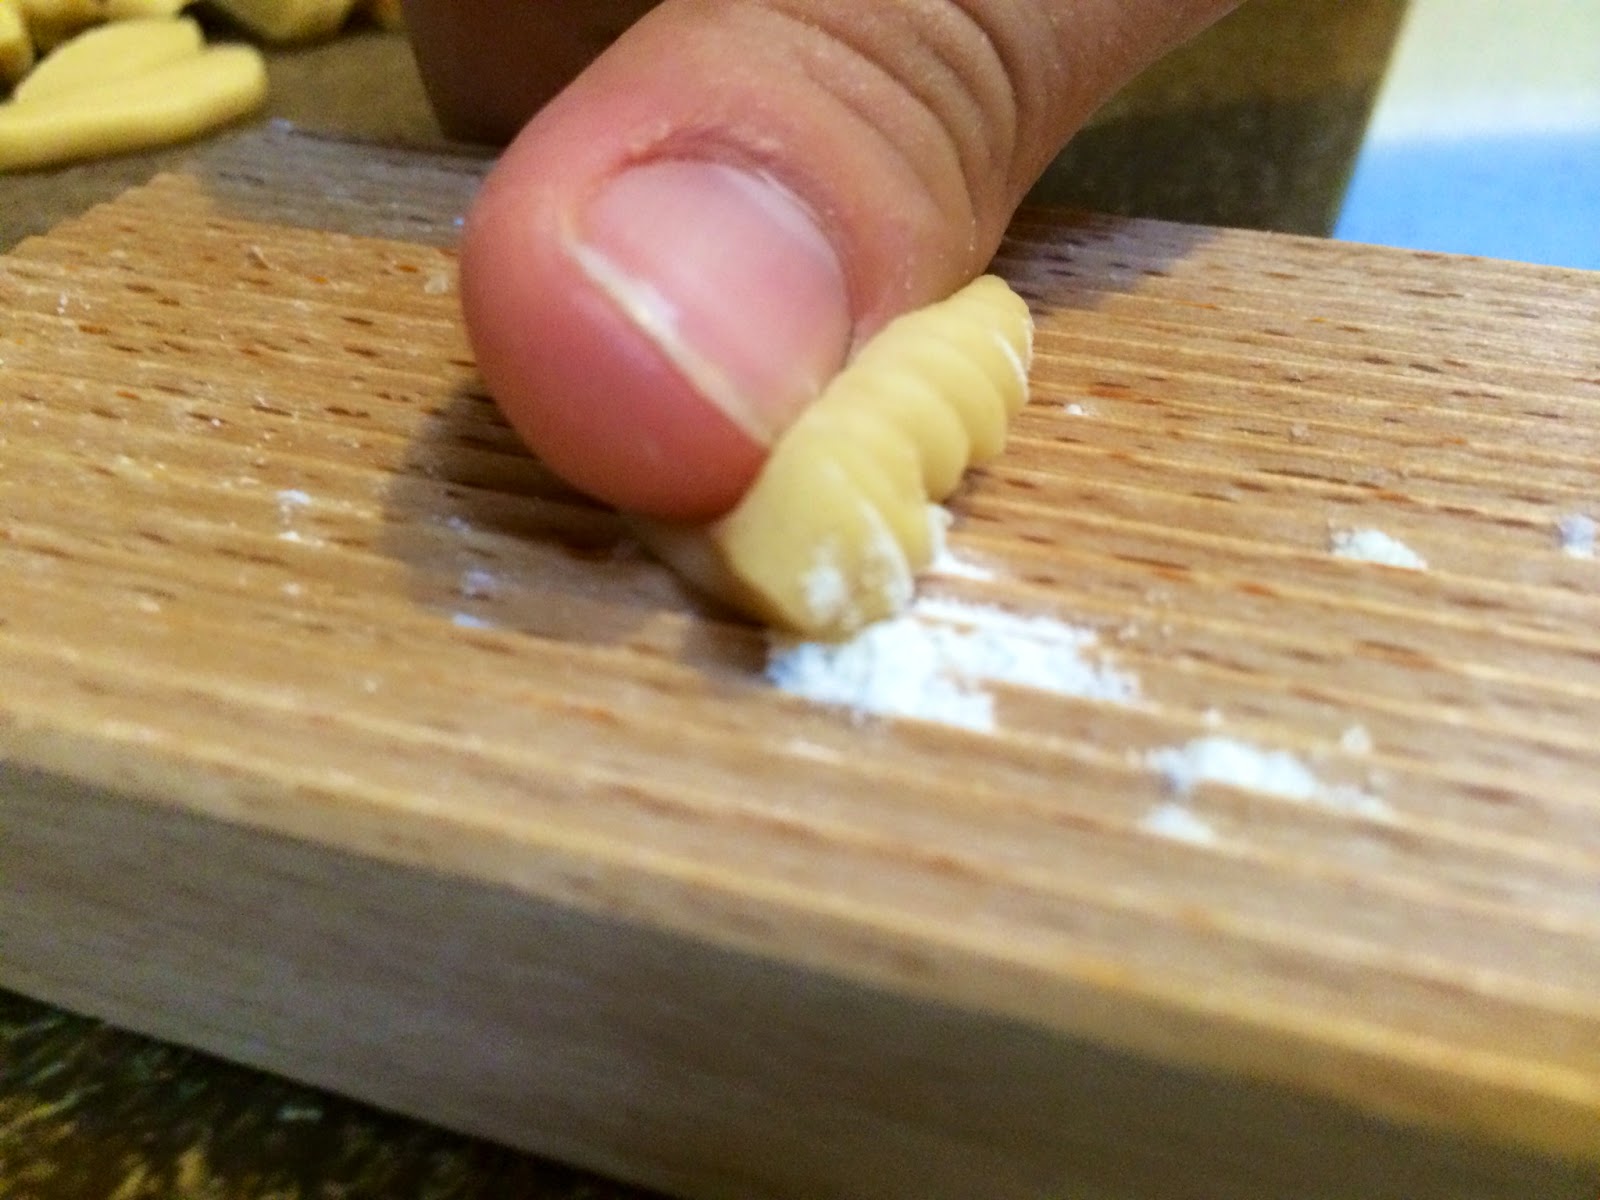
     Alright, now comes the fun part: Forming your ravioli. Once your dough is rested, it can be rolled out. If you have a pasta roller, then you're in luck. If not, you can use a rolling pin. If you are using a pasta roller, a tip that I learned very early on in my pasta-making days is to run the dough through each number of thickness twice because it will more sufficiently stretch your dough and makes it much less likely to rip while rolling. You want to roll your dough into sheets about one and a half to two inches wide, and as long as you desire. You will want to make an even number of dough sheets, because you will need two sheets to make the ravioli.

 
Directions for assembling ravioli
1. On a well floured surface, lay out one sheet of pasta dough.
 
2. Scoop out 2tsp sized portions of your filling onto the sheet, about one and a half inches from each other. Scoop as many as you can fit onto the sheet of dough.
 
3. Using your finger, brush a thin layer of water onto the dough around the filling. This will allow the top layer of dough to combine with the bottom layer in the next step.
 
4. Take a second sheet of pasta dough and lay it on top of the first. Trying not to let too much air in, use your fingers to press down the dough around the portions of filling. Don't squish the dough, but push down firm enough for it to stick well.
 
5. Cut around each portion of filling leaving about 1/4 inch of dough. As you finish the ravioli, lay them out on parchment paper, or on a well floured surface to avoid sticking.


     Unlike dried store bought pasta, home made pasta only needs to be boiled for a few minutes. Drop your ravioli into boiling water, and do not go anywhere. After just a couple of minutes, they'll start to float, and when they do, you know they're ready to be strained.
 
     Unless if you grew up in an Italian family, and know how to make real tomato sauce, do your self a favor and avoid dousing your hard work with sub-par store bought sauce that will mask all of the delicious subtle flavors of your home made ravioli. I think that the best way to really let the flavors shine is to prepare it as simply as possible. In a sauté pan, heat up some good olive oil, and add some garlic and baby spinach. Once your spinach is wilted, add your ravioli, season lightly with kosher salt and black pepper, and toss to coat them with the oil. Do this in small batches to avoid over crowding your pan, and as each batch is finished, transfer it into a serving bowl. Once all of the ravioli are cooked, I like to cut some grape tomatoes in half, and sprinkle them across the top.
     Like I said, this is a labor of love, and if you don't have the time or desire to make something delicious from scratch, then this isn't for you, but if you can find the time, then you will love this recipe. Let's nosh!